A few weeks ago I was sitting in what I sometimes describe (depending on my mood) as my favorite restaurant in the world: Ken’s Artisan Pizza in Portland, Oregon. It’s a tradition my dad, stepmom and I have every time I spend a few days in town; we go to Ken’s on my first night, or my last night, or sometimes both. Sometimes I secretly wish we could eat there all the nights in between too. I love the place that much.
If you’ve ever been to Ken’s you surely know why. It’s comfortable and friendly, and everything they make—the vast majority of which comes out of their hulking wood-fired oven, whose warm glow infuses the entire dining room—is spectacular. But this visit to Ken’s was a little different for me. Not because anything was less delicious than usual, but because I found myself doing more than just savoring the interplay between the pizza’s puffy, tender crust and intensely-flavored toppings. This time I was analyzing it, admiring the open-holed structure and polka-dot-like bits of char, wondering what kind of flour Ken uses in his dough, and whether he opts for commercial yeast or a sourdough culture. What hydration level has he settled on, I mused, and what percentage salt? How long does he ferment?
It seems my latest project has had more of an impact on me than I thought.
Yes, you see, I wasn’t totally honest when I said I didn’t cook anything for six months. I didn’t cook much for six months, but there was one project I was already so deeply involved in that I couldn’t give it up entirely.
That project, as you’ve already deduced, was pizza. Neapolitan-style pizza, or what in the U.S. is often called neo-Neapolitan, to be exact—thin-crusted pizzas with puffy, chewy rims and a restrained scattering of high-quality toppings.
It started about a year ago. I can’t remember if there was something that triggered it, I mean other than my general frustration that the best pizza here in our corner of provincial Germany is what you pull out of the supermarket’s freezer cabinet. It boggles my mind; we’re not even that far from Italy, but in pizza terms we might as well be in Japan. Wait, scratch that—these days even Japan is a better place to be.
But as I’m one who likes to see an opportunity in any problem (well, at least when it comes to food), before I knew it I had embarked on a personal mission to develop a recipe for the most excellent homemade pizza this side of the Alps. I knew I couldn’t do real Neapolitan pizza, since that requires a wood-fired oven capable of temperatures in excess of 900F/480C (maybe someday, when we have a backyard…), but I intended to get as close as I possibly could.
I won’t bore you with a chronological account of all my pizza successes and failures over the last year, but suffice it to say I know more about the subject than I ever thought I would. I’ve tried just about every different kind of flour, leavener, hydration level, fermentation time, kneading technique and percentage of things like salt and oil imaginable. I mined sites like pizzamaking.com and the Fresh Loaf for the latest tips and tricks, and tried methods touted by everyone from Jeffrey Steingarten to Heston Blumenthal. I learned how to calculate baker’s percentages with my eyes closed. In a fit of insanity I even cultivated a sourdough starter, something I swore I would never do again after my last one died such an agonizing, drawn-out death at the back of my fridge. Frustrated with my oven’s wimpy output, I bought a new one—as well as one of these, which turned out to be fabulous for baking naan and pita, but not so fabulous for pizza, particularly once I discovered how to squeeze a little more heat out of my regular oven.

And would you believe it? After all that, I’m still not sick of pizza. Far more amazing, though, is I think I’ve cracked it. I mean, it’s still not the genuine article and it certainly wouldn’t win any contest against a competent pizzaiolo with a pile of burning logs, but for a home-baked pizza it is pretty darn good. Actually, scratch the ‘home-baked’ bit—it’s pretty darn good period. And reliably so; in fact, when I realized that I can’t actually remember my last pizza flop, I decided the time has come to share my project with you.
I know there’s more opinions on pizza out there than fish in the sea (particularly these days), and plenty of people have been at it a lot longer than me. But what I’ve come to realize is that pizza is also a dish that’s as much about feeling as it is about formulas, and success is more about figuring out what works best for your unique set of variables (your flour, your oven…) than slavishly following a recipe. That said, of course I’ll give you one. Actually, two. But what I also hope is that even those of you who are seasoned pizza-makers might pick up a new idea or two. And I’d love for you to share your tips and tricks with me in the comments.
But first, here’s a summary of the most important things I’ve learned.
- You need a high-gluten flour for this kind of pizza crust, something around 12-13% protein. In Europe, where flour tends to be much softer, that means adding in extra wheat gluten. I use an all-purpose flour (here labeled 550) with about 10% protein, and add 3g gluten for every 100g of flour. Even with this adjustment, though, the dough behaves differently; European flours need to be worked much longer before the gluten has reached its proper stage of development. I’ve thus written in an extra step for using soft-wheat flour, which involves pulsing the dough in a food processor at regular intervals during the initial fermentation.
- Yes, you read that right: a food processor makes excellent pizza dough, and prevents the dough from over-oxidizing as it’s mixed.
- You’ve already heard about delayed fermentation, and it’s as crucial to good pizza as it is to good bread. Using a tiny amount of yeast, a low temperature environment and a long stretch of time results in an astonishingly improved flavor in the finished product. My absolute minimum fermentation time for pizza dough when using commercial yeast is 3 days, though I prefer 4 or even 5 (longer than that and the gluten can start to break down). This is easy to work into your schedule when you have a regular pizza day. Say you make pizza every Saturday, then you just mix up the dough on Monday or Tuesday and let it age in the back of the fridge all week.
- That said, the single biggest thing you can do to improve your pizza is to cultivate and maintain a sourdough starter. The differences are astonishing: a sourdough crust is even more deeply flavored, it’s chewier and airier, it’s easier to digest (I never have the rock-in-my-belly feeling after sourdough pizza) and develops flavor much more quickly than dough made with commercial yeast. In fact, an overnight fermentation is all you need, and I’ve even made same-day sourdough pizza that was surprisingly great. Cultivating a starter is also dead easy; I followed Susan’s brilliantly straightforward method, and within a little over a week I had a 100% hydration starter raring to go. This is really a simple, foolproof starter and so is its maintenance (I keep mine refrigerated and thus only need to feed it once a week). After struggling with Nancy Silverton’s complex and cryptic method a few years ago I never thought I’d bother with sourdough again; now, I can’t imagine life without a culture in the fridge.
- Please, please, please invest in a digital scale if you don’t have one already, and familiarize yourself with baker’s percentages. They’re really not hard (they just tell you the ingredients’ percentage relative to the flour), and this allows you to scale your pizza recipe up and down with ease, as well as make fine adjustments to things like hydration and salt levels.
- Speaking of hydration levels, this is the variable I’ve toyed with the most. What seems to work best for me is a hydration of about 65%, which is firm enough to handle and shape without difficulty, but has enough moisture to prevent it from drying out and getting ‘crackery’ in a home oven.
- Unless you’re trying to impress your friends, I don’t see any reason to fuss around with a pizza peel. Use parchment paper instead. Parchment is a miracle where pizza is concerned: you shape and top your dough directly on it, transfer the whole thing onto a baking sheet or cutting board and from there it slides effortlessly into the oven. The pizza bakes beautifully on it, and as soon as the crust is set the paper can be easily slipped out from underneath. I can’t tell you how much easier this is than struggling to transfer a fragile crust onto a pizza peel and then jerking and shaking it onto your stone; every time I’ve tried this I’ve ended up with a misshapen pizza and more toppings on the floor of my oven than on the dough. Yes, I’m probably extraordinarily clumsy and yes, peels are what the professionals use, but they have ovens at temperatures that would simply incinerate paper; at least on this one count we home cooks have the advantage.
- Speaking of pizza stones, what I recommend is not a stone at all—it’s a cast iron plate. I can’t tell you how glad I am that I lugged this thing back to Europe with me. It gets ferociously hot, bakes evenly, and you’ll never have to worry about it breaking (which is the fate all my stones have met). Of course lacking access to one of these, a stone will do just fine.
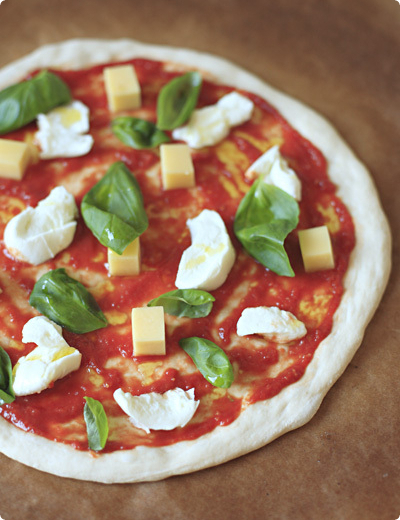
- Everybody says it, and I’ll repeat it: don’t, don’t, don’t overload your pizza with toppings. Too many and the whole thing will take too long to bake. Result? The dreaded leathery and/or crackery crust. A good rule of thumb is no more than 100g (3.5oz) cheese, and no more than a handful (total volume) of any other topping(s) you desire. Also, cube your cheese rather than grating; this leaves large patches of sauce exposed and helps more liquid to evaporate. In other words, pizzas that are less watery and more intensely flavored.
- And finally, here’s what I’ve found to be the most successful technique for squeezing the maximum heat out of a home oven (that is, without cutting off the lock and running it on the cleaning cycle!). All you need is an oven equipped with a broil or grill function in the main chamber*. First, contrary to what a lot of the pizza baking advice says, don’t position your stone near the bottom of the oven. Position it near the top, ideally about four to five inches (10-12cm) below the element. Preheat your oven on its highest setting for 60 minutes. Then, just before you slip your pizza in, switch it to broil. Put your pizza in and then watch carefully; the combination of the superhot stone and intense heat from above will cause the pizza to cook in just a few minutes. In case the top starts to over-brown (or heaven forbid, burn) before the crust is done, just switch back to bake, or even switch it off completely. The stone’s residual heat will take care of the rest. *If you have it in a separate chamber, you can always try the Heston Blumenthal-inspired skillet-broiler method.

Pizza Margherita
I know, this isn’t a purists’ margherita, but I’ve never claimed to be a purist of any kind. Despite my embellishments, though, it still retains its trademark simplicity and exquisite harmony of sweet tomato, spicy basil and buttery cheese, just with a little more depth. On the subject of cheese, do splurge on something good—you use so little of it that every bite needs to count (and at these amounts nothing is that expensive anyway).
You’ll notice there are two crust options here. The sourdough crust is the one I make almost exclusively by now, so if you happen to have a 100% hydration starter on hand, you’re good to go. For everyone else I’ve included my regular-yeast version—just note the considerably longer fermentation time, and plan your pizza activities well in advance. I know, it’s tough. But so worth it.
Oh, and yes, nearly all the measurements here are in metric weight. I wasn’t kidding about buying a scale!
p.s. for you bread geeks, here are my percentages: hydration 65%, salt 2.5%, oil 1.75%, yeast approx .25%
Yield: 2 12-inch (31cm) pizzas, serving 2-3
Commercial-yeast crust:
400 grams bread flour (or 388 grams all-purpose flour + 12g wheat gluten)
scant 1/4 teaspoon instant yeast (about 1 gram, but difficult to weigh on most scales)
5 grams (1 teaspoon) sugar
260 grams cold water (if your kitchen is particularly warm, use ice-cold)
10 grams (2 teaspoons) salt
7 grams (1/2 tablespoon) vegetable oil
Sourdough crust:
325 grams bread flour (or 313 all-purpose flour + 12g wheat gluten)
5 grams (1 teaspoon) sugar
150 grams 100% hydration starter, ripe
185 grams cold water (if your kitchen if particularly warm, use ice-cold)
10 grams (2 teaspoons) salt
7 grams (1/2 tablespoon) vegetable oil
Tomato sauce:
1 (14oz/400g) can whole peeled plum tomatoes
1 heaping tablespoon tomato paste
1 clove garlic, chopped
1 tablespoon olive oil
1/2 teaspoon salt
1 1/2 teaspoons sugar
1/2 teaspoon red wine vinegar
pinch chile flakes
7oz (200g) cheeses of your choice, preferably a mixture of buffalo mozzarella and something sharper and/or pungent such as provolone piccante, taleggio or a young pecorino
handful fresh basil
2 tablespoons best-quality extra-virgin olive oil
For the commercially-yeasted crust, pulse flour (with gluten, if using), yeast and sugar in the food processor. With the machine running, add the water and process just until a cohesive dough forms. Let sit, covered, for 20 minutes. Pour in the salt and oil, switch on the machine, and process until the dough is smooth and forms a ball around the blade, about 30 seconds. Let sit, covered, one hour*. Remove the dough from the processor, knead lightly on an oiled surface a few times, place into a large oiled bowl or container, cover tightly and refrigerate. Store in the back of the fridge for 3-5 days (the longer the better) before using. *If using European flour with gluten added, process briefly (~5 seconds) every 15 minutes during this hour, for a total of four times.
For the sourdough crust, pulse flour (with gluten, if using) and sugar in the food processor. In a separate bowl, stir together the starter and water until the starter has dissolved. With the machine running, pour in the liquid and process just until a cohesive dough forms. Let sit, covered, for 20 minutes. Pour in the salt and oil, switch on the machine, and process until the dough is smooth and forms a ball around the blade, about 30 seconds. Let sit, covered, two hours*. Remove from the processor, knead lightly on an oiled surface a few times, place into a large oiled bowl or container, cover tightly and refrigerate. Refrigerate overnight, or for up to two days. *If using European flour with gluten added, process briefly (~5 seconds) every 30 minutes during these two hours, for a total of four times.
Prepare the toppings. For the sauce, drain your tomatoes in a sieve. Remove any stray bits of skin, then, one at a time, gently squeeze the tomatoes to help them release as much liquid as possible. If this causes them to burst and expel watery seeds, so much the better. Process the drained tomatoes along with the rest of the sauce ingredients in a food processor until smooth. Alternatively a deep bowl and an immersion blender work great too. If using fresh mozzarella, tear it into rough chunks and set these on a double thickness of paper towels to drain. Cut firmer cheeses into 1/2-inch (1cm) cubes. Remove basil leaves from their stems.
Shaping, topping and baking. About two hours before you want to bake the pizzas, remove the dough from the fridge. Divide the dough in half and shape each half into a ball, pulling the surface skin taut and pinching it together underneath. Set the balls a few inches apart on a lightly floured surface, dust with flour, and cover with a clean kitchen towel. Let rest for 60-90 minutes.
Meanwhile, about an hour before you think you’ll be ready to bake, place your stone or plate in the upper part of your oven (about four to five inches/10-12cm from the top element) and preheat to its maximum setting.
Prepare two squares of parchment paper. Dust one of the dough balls with flour and lay it in the center of a parchment square. Using the flat underside of your fingers, gently press the dough into an 8-inch (20cm) disk, leaving the outer edge slightly thicker than the center. Now taking care not to tear the dough, gently stretch the dough into an approximately 12-inch (31cm) round, working along the edges and giving the dough quarter turns as you stretch. Another good technique is to pick up the pizza by its edges and keep turning it, letting gravity pull the dough down. If it tears anywhere, just pinch it back together, and if it sticks to anything, dust it with a little more flour. When you have a more or less round crust lying on your parchment, trim the paper around it so that it’s only a little larger than the pizza. Prick any large bubbles you see around the dough’s outer edge—these will just burn in the oven. Lay a towel over the crust and repeat with the other dough ball.
Using the back of a spoon, spread half the tomato sauce (about 1/2 cup (125ml)) in a thin layer over the surface of one crust, leaving 1/2-inch (1cm) border around the edge. Scatter half the cubed cheese over the sauce, and lay a few whole basil leaves among the cubes. Drizzle 1 tablespoon of olive oil in a spiral pattern over the top.
Switch your oven to broil. Using a pizza peel, cutting board or the back of a baking sheet, transfer the topped pizza (still on its parchment) to the oven and slide it onto your stone. Close the door and let it bake for four to five minutes, or until the crust has puffed and set. Working quickly, open the door and insert a spatula between the pizza and parchment paper. Pull out the paper (it’s not that hot, so you can use your bare hand) and close the door again to let the pizza finish baking, about another three to five minutes (if you forget to remove the paper it’s not a big tragedy, the bottom just doesn’t brown quite as deeply). When the topping is bubbling and the crust is golden, remove the pizza from the oven using a peel or a couple of spatulas. Transfer to a wire rack to cool for a couple of minutes before slicing and serving. Top and bake the second pizza in the same way.

Melissa, I've read your words like I read poetry. A beautiful pizza indeed. xx
So glad you are back!
Happy to see your words on my RSS feed again!I, too, have followed a similar journey to create a great homemade pizza. And I have come to many of the same conclusions about a sourdough starter, parchment paper, and weighing ingredients. Let me add a couple of extra hints:1. My sauce is a simple mix of Pomi chopped tomatoes and Penezy's Pizza Seasoning g — wins 'em over every time.2. We like lots of vegetables in our toppings, but I roast them before building the pizza. Otherwise, they never emerge from the raw state by the time the crust is done.2. Check out this article from the LA Times a few years ago. Will get you one step closer to having that wood-fired oven effect. Get thee some firebricks! http://www.latimes.com/features/food/la-fo-homepizza25-2009mar25,0,255374.story
why do i feel like eating pizza all of a sudden? looks delicious!
Hello! So good to see you back with a recipe and with beautiful photos 🙂 I use the skillet-broiler method – it makes absolutely amazing pizza and no fussing with pizza stones, peels, papers, transferring pizza from place to place etc.
A-ha! I can see a fellow pizza geek here. I thought you had to be Italian for that 🙂 It is by far the one thing I miss the most of Italy. I agree with basically all of your tips, although I have no tried the sourdough starter yet, and there is no cast iron plate anywhere is sight here, so I stick to my stone. I use more water in my dough, but I have a secret weapon: my partner was born in Naples and this somehow gives him a secret superpower of being able to stretch impossibly wet dough. If I'm handling it, I cut the water down. Another difference: to me it is vital to cook the sauce until it is reduced. I let it bubble for at least one hour. I think it improves the flavour. Anyway, a fantastic post. We pizza geek people are always looking for the next tip.
Yummy, Yummy and again yummy margherita is the my favourite pizza showing how delicious could be the simple things.
Oh…Swoon! I am so glad to have rediscovered your blog again! You have such a great talent for providing information on technique, food history/culture and everything else beautifully relevant without even coming close to the dry style that so many other blogs have. I love these long posts (and am performing baker's percentages exercises while reading!), THANK YOU!
Ah, your pizza looks quite delicious…We are pizza connoisseurs around here and LOVE a sourdough crust. Yum.
Nice post! I'll definitely try some of your tricks and tips. I especially like the idea of cubing the cheese. And the broiler tip, too. Very interesting.One comment about sourdough: I'm not so sure that ice cold water is a good general recommendation for bringing together the sourdough. Yes, it will slow down the yeast, but I think the point of that first fermentation phase is to get things kicked off enough so that once in the fridge the process will continue. Every starter is different, and many are very slow; mine, for example, can take 4-6 hours at room temperature to double. (I assume that yours is of the faster variety?) If I don't get things kicked off properly at room temp, my dough will make very little progress if I age it in the fridge — so I use water at around 100 F to set things in motion.Hi Adam, good that you brought this up. Actually my starter takes just as long as yours, and when I make bread by hand I also use warm water. The use of cold water in this recipe has everything to do with the use of a food processor; one of the key tips I've picked up is that the processor's high speed raises the temperature of dough very quickly, so to avoid potentially overheating it, it's best to start with cold water. After the second round of processing (after the salt and oil have been added), my dough is pretty much always around room temperature, and then of course gets a full two hours of fermentation on the counter before going in the fridge. This has always worked for me, though as always with sourdough it's best to respond to the dough's look and feel. Just take a good look at it the next day; it should have more or less doubled overnight, and you can always take it out of the fridge a bit earlier if it hasn't. -m
absolutly love pizza:) you should try the one in greece parga… lovely:):)www.pargahellas.wordpress.com
So happy to see you back and writing as graciously as ever…and with a gorgeous pizza to boot!
A mouth-watering recipe. Wow! That´s fantastic, thanks for sharing this!
Great tips here, even after I thought I did my research. I always ferment overnight but never tried for several days. Will also try w/ sourdough. I once used my outdoor grill for pizza using a baking stone. The results- the bottom of pizza was perfect but the top didn't brown well enough. I'll be going back to the oven, but this time with the baking stone closer to the grill. Thanks for the great post.
While you were out…. I made your delicious mandarin jam as Christmas gifts, absolutely delicious!!!! and I also made your New Year's pate, I hosted a luncheon with some friends and also had Christmas celebrated at home so I had the perfect excuse, I had to run around the enighborhood to find the chicken livers who would of thought that with this era of supermarkets simple things like chicken livers are getting harder to find but nonetheles I made it and it was as my daughter's friend said "TO DIE FOR" Welcome back, we missed you!!Wonderful to hear, thank you! 🙂 -m
I am absolutely in love with you website!! Fabulous work. I am now living in Italy and this pizza is temping me to step outside for a slice…http://blog.boxersadventures.comInternational Blog and Shop
Hi Melissa – I'm in Germany as well, newly transplanted, and would love to know, how do I tell which flours have added gluten here? thanks!Hi Lani, as far as I know no German flours have added gluten. You can buy wheat gluten ('Weizenkleber') in Reformhäuser (shops that cater to special dietary needs), or on the internet, and add it to supermarket flour to boost its elasticity. For bread and pizza I usually use flour types 550 (all-purpose) and 1050 (sort of a white whole-wheat flour). Hope this helps! -m